_ti14573_en.jpg)
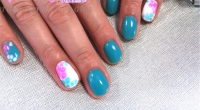
Turtle Nail Art: when we speak about this particular type of Nails Decoration we talk about one of the most recent trends in the Nails sector which has already won over many women!
Turtle Nail Art, in fact, allows to obtain a really original, colorful and perfect finish for summer months...but do we know how to realise it?
Having regarded to the numerous requests received by our followers, we decided to dedicate this new deepening precisely to "Turtle Nails", showing step by step the correct phases of work and the necessary Nails Products to achieve a perfect result!
_ti14574_en.jpg)
We begin our Nail Art with the first essential Step: the application of a slight layer of Uv Builder Gel Medium Viscosity on our Coloured Base.
Obviously, we will be able to realize the Turtle Effect both on a Gel Polish Coloured Base that Gel Base Coat (suitably catalysed), the important element to which we should pay attention will be the use of Uv Builder Gel Medium Viscosity: the use of other products (as a Gel Polish Base or a Builder Gel with different viscosity), in fact, would compromise the success of our Nail Art!
_ti14575_en.jpg)
The "small balls" that we will create in the next Step of Work require a Medium Viscosity in order to remain compact and well defined, thus giving life to the Turtle Effect that is desired for our Creation.
CLICK AND BUY THE UV BUILDER GEL MEDIUM VISCOSITY
Then We apply our Uv Builder Gel Medium Viscosity with the aid of a Gel Nail Brush: we coat a thin layer of product, by applying it as you would with a Normal Nail Polish (therefore with no bead or particular thickness)!
_ti14576_en.jpg)
Let’s go to the heart of the work and prepare ourselves to the realisation of the details that will give shape to our Turtle Nails!
With the aid of a Dotting Tool - also called Dotter - we will take from our Bottle a small amount of Coloured Gel Nail Polish: it will be more than sufficient a droplet of Product, in this way we avoid excessive doses.
With the aid of the integrated brush present in the bottle we "lay" a drop of Colour on our Nail Art Dotting Tool!
_ti14577_en.jpg)
Arrived at this point, we proceed by creating small dots on the nail surface (on which it will be present our thin layer of Builder Gel still fresh)!
The small polka-dots of colour will broaden gradually once in contact with the Uv Builder Gel...and in the meanwhile we will continue to draw other dots positioning them on the nail surface, in the area that we prefer according to the effect that we want to achieve!
_ti14578_en.jpg)
As we will see during the work itself, the Nail Art Dotting Tool is a perfect Tool for this type of Nail Art: its small spherical tip, in fact, allows us to obtain precise points and to use minimum quantities of product for well defined and impeccable a finish!
Once completed the Decoration of the Nail, we wait for about 60/90 seconds: just the necessary time for our small dots to enlarge, giving life to the Turtle Effect, before being able to proceed with the next Step!
_ti14579_en.jpg)
Let’s proceed with the catalysis of the work done so far, to "Stop" our dots and fix the Design made on the Nail!
We let our Nail Art dry by perfectly fixing within our UV or LED lamp and waiting for the right laying times according to the type of Lamp that we are using.
_ti14580_en.jpg)
To make our Turtle Nail Art even more rich, colorful and original, we follow the same procedure followed so far...but with the inverse colours!
In this way we will be able to choose to Decorate our Nails differently, by alternating them or by choosing, for example, to use the opposite colours only in the annular, etc...go-ahed to your entire creativity girls!
CLICK AND DISCOVER THE GEL NAIL POLISH COLORS!
We follow, therefore, all the Steps described up to this point and we proceed step by step with the Decoration of the other Nails of our Hand. Once the Decoration is finished, we proceed by sealing our Work and catalysing in Lamp!
_ti14581_en.jpg)
So here we arrived at the conclusion of our Work...and here’s our Turtle Nail Art!
A Nail Art of the sure visual impact, original (think of how many color combinations are possible!) and really current, perfect for those who want Nails always that are up to date and in line with the more contemporary trends!
As always, all that remains is to wish you Good Work and Have Fun Girls...even with the new Turtle Nail Art!


